As of the video, you can take a photo. How to save an image from a video clip
- Screenshot
- View in player
- VLC Media Player
- Media player classic
- Youtube
- How to take a snapshot in Sony Vegas
- Save frame through
- How to take photo from video with VLC Player
- How to take a photo from a video using Media Player Classic
- How to save a frame of video in the program GOMPlayer
- How to save a frame from a video in KMPlayer

Good day to all my dear friends and readers. It's no secret that I am now. So there you need to put the main (main) picture on your posts. And if this is a video, then the preview should be set as a frame from this video. I often have to take screenshots from a video (not only within the framework of the project), and here I thought that such a feature could be useful to many.
I have collected for you some of the best ways in my opinion on how to cut a frame from a video, so that in the future you can use this frame for any purpose. Like the idea? Then let's get started!
Screenshot
And by the way, if you want to take a snapshot of a fragment of a video, I advise you to use a third-party program, rather than pasting into paint. You can take any program, for example, Lightshot or Joxi. About Lightshot can read in the same article. You just need to select the desired area and save.
View in player
Making screenshots is a universal theme, and to many this procedure seems dreary and inconvenient. Therefore, if you prefer to watch videos (movies) through players on a computer, then I will also show you how to achieve our goals and isolate the frame. For example, I will show this action on the two most popular video players.
VLC Media Player
Highly good player , which gained our popularity relatively recently. Inside there is its own snapshot function.

Everything. After that, you can go to the folder that you specified in the settings and enjoy the photo you made from the video. Simply? Easier nowhere)
Media player classic
I know that many people use Media player Classic. In fact, this is a very cool player and it usually comes with the K-Lite Codec Pack (but in general it is downloaded separately). Anyway. Let's better go to the most delicious.
There is no need to create any directories, since screenshots will be saved in fact, i.e. You yourself will choose the path when saving.
To do this, run the movie on Media player claccic and select the menu "File" - "Save Image". Even faster will use the combination of ALT + I. Everything. And no unnecessary movements. Photo is ready.

Youtube
Well, since I started talking about my studies at the master of social projects, then I will tell you how to make quick screenshots in YouTube through Google Chrome.
Well, almost everything. See how many different ways, and that's not all. So, I think that now with this you should have no problems.
Well, that's basically all I wanted to tell you in my article today. If you liked the article, then be sure to subscribe to my blog updates, to always be aware of all the most interesting. And of course I am always waiting for you again on the pages of my site. Good luck to you. Bye Bye!
Sincerely, Dmitry Kostin.
A freeze frame is a static frame that lingers on the screen for a while. In fact, this is done quite simply, therefore, this video editing lesson in Sony Vegas will teach you to do it without any extra effort.
How to take a snapshot in Sony Vegas
1. Start the video editor and transfer the video in which you want to make a still image on the timeline. First you need to set up a preview. At the top of the Video Preview window, find the Preview Quality drop-down menu button, where choose Best -> Full Size.

2. Then on the timeline, move the slider to the frame that you want to make static, and then in the preview window, click the button in the form of a floppy disk. So you take a snapshot and save the frame in * .jpg format.

3. Select where to save the file. Now our frame can be found in the “All media files” tab.

4. Now you can cut the video into two parts using the "S" key in the place where we took the frame, and insert the saved image there. Thus, with the help of simple actions, we got the effect of "freeze frame".

That's all! As you can see, making a snapshot effect in Sony Vegas is pretty simple. You can turn on the fantasy and create pretty interesting videos using this effect.
Sometimes you want to stop a moment from a video clip. Frame and enjoy the photo every day. Or even set as desktop wallpaper. BUT beautiful image and in social. networks would do well to boast. In this article, you will learn how to easily save an image from a video using a simple player.
We can not constantly switch to the photo mode and back when shooting. In this case, we miss a lot of interesting moments, and even more so if the camera is mounted on a tripod, and we are three meters from the camera.
Suppose we can take a snapshot from the monitor screen in a matter of seconds. Then paste into any photo editor and see it there. All this is done with one click of the “screen shot” or “PrintScreen” button in the upper right corner of the keyboard. Someone like. But with the video, this method is not a ride. I tried to save with different players . The picture came out completely black or distorted. Plus, all this was visible frame player on the image.
I did not want to rummage through the Internet in search of a special program, since you will not use them anyway. And it is not necessary to litter the computer with excess garbage. For this purpose, we will use a program that will be useful to us in the future for listening to music and watching movies. Yes, this is a media player, in which there is a function of capturing a frame from video.
Save frame through
Media Player Classic
In most cases, this player is a standard application in operating system windows And there will be no need to download it from the Internet. Select the video file and click on it with the right mouse button. In the window that appears, select "Play in MPC". If there is no such item, then click “Open with” and select “Media Player classic ". Pressing the left key, start the movie.

The video is played, and in the meantime we are waiting for the moment when it will be necessary to pause to extract the image in a separate file.
Read more:
Next in the player's toolbar in the “File (File)” tab, we are looking for “Save Image (Save Image)”. By the way, opposite to this function you will see the key combination Alt + I. These are the shortcut keys for this feature ““.

Click save. When saving, we will be given a choice of image formats. Just in case, save two frames of different formats (JPG and PNG) The fact is that some photo editors may not see one or another image format.
From there, the resulting photo, open the Paint program (Start - All Programs - Accessories - Paint) and press the key combination Ctrl + V. The picture will appear in the editor window, and you will only have to save the resulting frame.
If you do not want to mess around with the graphic editor, and you have Light Alloy installed (if not, download it on the official website www.light-alloy.ru ), open the video with this program and pause the playback. Now press the F12 key. The frame will be saved as a photo, and the path to the folder in which the program has saved the cut frame will appear on the screen. In the program settings, you can choose the folder in which the received frames should be saved.
On the Internet you can find funny animated images made from fragments of video. Cutting such an animation is not very difficult; it is enough to save a fragment of the source file as a sequence of frames and assemble them into a program that can work with animated images.
You will need
- - VirtualDub program;
- - Photoshop program.
Instruction
In order to create a sequence of frames, open the file from which you want to cut the animation in VirtualDub with Ctrl + O or using the Open video file command from the File menu.
Find the frame from which the passage you are interested in begins. This can be done by playing the video with the Play button. If the file is long, use the mouse to move the slider, which can be seen under the preview window. You can move a frame forward or backward with the arrow keys.
Set the beginning of the passage using the Set selection start option from the Edit menu. Rewind the video until the end of the passage you are interested in and specify the end of the selected area using the Set selection end option from the same menu.
Save the selected passage as separate images. You can do this with the Image sequence option from the Export group of the File menu. Specify the folder where the entire sequence of images and the format of the saved files will go. If you want to control frame compression, select jpeg format. The degree of image compression can be adjusted in the same window using the slider. The process of saving frames will begin after you click on the OK button.
If you do not set other settings, the frames will be saved with a sequence number in the file name. Open the very first file from the saved sequence in Photoshop editor.
Open the animation palette with the Animation option from the Window menu. The palette will appear with the first frame that already exists in it. Add a second frame by pressing the last-doubling button, which looks like a sheet with a curved corner.
Place option from the File menu paste into open document the next frame in order. You will notice that the image in the second frame of the animation palette has changed. Add another frame to the animation and place the following image in order into the document using the Place option. In this way, insert all saved frames.
Adjust the duration of frames in the animation. To do this, select the first frame and, pressing the Shift key, click on the last frame. Click the arrow at the bottom of any frame and select the frame duration from the list or enter an arbitrary value.
If you wish, you can crop the animation by cutting off the extra with the Crop Tool. The Image Size option from the Image menu helps you change the linear dimensions of the image.
The animation cut from the video is saved with the Save for Web option from the File menu.
Related videos
Sources:
- Lessons on creating animation in Photoshop
Not always, photographing anything, you can capture exactly the frame that you wanted to get. Often, when you look at a photo on a computer, you begin to understand that all of a photo requires only a specific fragment. Also, a fragment of a photo is sometimes needed if you want to make an avatar from it social network or forum, or some kind of collage. In this article, you will learn how to cut a fragment from a regular photo using various programs.
Instruction
The easiest option is to use adobe program Photoshop. Open the program and upload the photo you want to crop. On the toolbar, find the Crop tool, the icon of which looks like a black frame. Use the left mouse button to select a rectangular fragment in the photo, frame it on the eye or specify the required dimensions in the top panel, and press Enter. Save the new image under any name.
Also, a fragment of the picture can be obtained by cutting a photo from the video. To do this, open the video on the storyboard strip and select the desired frame on the viewing screen. Under the screen, click the camera icon (Capture) - the selected frame will be saved in jpeg format and it will automatically be assigned a name with the time and date of the current day.
To cut a photo in Corel Photo Paint, upload a photo, and then select the “Image” section in the menu and then the Cutout Lab. In the window that appears, use the mouse to select the desired fragment of the selected photo - use the left key to draw the line of the border of the fragment, and with the right key erase the lines. Circle the desired fragment, fill in the resulting area and click OK. Save the cut image.
Then open, if necessary, another image to which you want to paste the piece that you just cut. Scale them to the same size and proportions, paste the fragment in the right place of the image, export the resulting file and save it to jpeg.
Sources:
- cut on photo
Sometimes you want to save some funny and memorable moments from the movie . There are a large number of program editors that allow you to do this without much difficulty. They will help to save a certain segment, or a frame from the film in the format of a video or image.
You will need
- - Software for capturing video or images (VirtualDub, Fraps) or a media player with the corresponding function.
Instruction
If you want to save a certain segment of the movie as a video, then Virtual Dub editor will help. This is a freeware program that allows you to cut a certain point, or vice versa, save it as a separate file. To do this, open right video through the corresponding item in the menu (“File” - “Open video file”). Then rearrange the progress bar slider to the desired position (to the initial frame) and press the “Home” button on the keyboard. Then, using the arrows or the cursor, the slider moves to the end position where the “End” button is pressed. The selected fragment is saved using the F7 key. Also Virtual Dub allows you to save one specific frame, for this you need to adjust the slider and press the Ctrl and 1 keys in the same way, after which the image appears in the clipboard. It can be inserted into standard Paint or any other graphics editor, and save it in the desired format.
Not rarely while watching a video it is necessary to save a frame from the video, or else they say to make a photo from the video. In this article we will discuss how this is done using the example of four popular ones.
How to take photo from video with VLC Player
VLC Player - one of the most popular video players at the moment. VLC Player earned its popularity thanks to its simple interface and support of all necessary functions. Among these functions is the creation of photos from the video. In order to take a photo from a video using VLC player you need to open the drop-down menu "Video" and select "Snapshot".
After that, the program will save the current frame as a separate photo. For convenience, you can pause the video and then use this feature. All saved frames will be in the folder C: \ Users \ Username \ Pictures. You can also find them in the library "Images".
How to take a photo from a video using Media Player Classic
Media Player Classic is another very popular video player. If you use it, then in order to take a photo from the video you need to open the drop-down menu “File” and select the item “Save Image”.

After that, a window will appear in which you need to specify the folder for saving this frame. It should also be noted that in Media Player Classic you can save frames using the ALT + I key combination, without opening the “File” menu.
In addition to saving a single frame, in Media Player Classic you can make frames from the video. To do this, open the “File” menu and select “Save Thumbnails”.
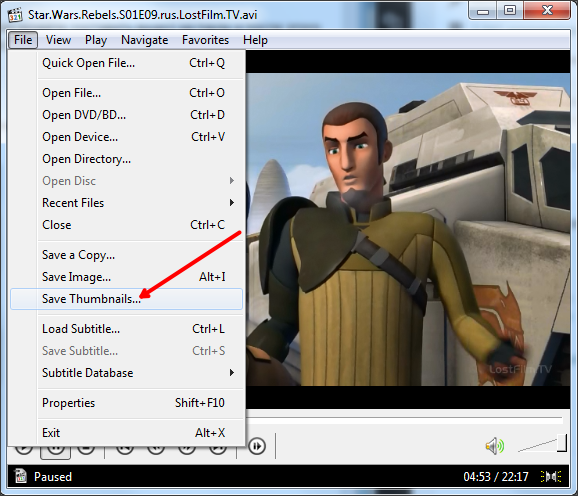
The result is a picture as in the screenshot (below).

On this picture displays the name of the video file, its size, duration and resolution. Under this information is cutting frames from the video with the display of time.
How to save a frame of video in the program GOMPlayer
If you are using the GOMPlayer media player, then in order to save a photo from the video, you need to right-click on the video itself and select the item “Video - Save the Current Frame” in the menu that appears. Also for this you can use the key combination CTRL + E.

As well as in Media Player Classic, in the GOMPlayer program, you can cut video from frames. To do this, use the function "Video - Create Snapshot Preview".
How to save a frame from a video in KMPlayer
If you use KMPlayer to watch the video, then in order to save a frame from the video, you need to right-click on the video and open the “Capture - Capture the source frame” menu. After that, a window will appear on the screen in which you just need to save the resulting frame to any folder.

Also in KMPlayer there is a function called “Frame Extraction”, it can be launched using the “Capture” menu or using the CTRL + G key combination. After starting this function, a small window will appear on the screen in which you can configure auto save frames. For example, you can configure to save every hundredth frame or one frame per second.

After you select the desired settings in the "Frame Extraction" window, start the video playback and click on the "Start" button. After that, the program will start saving frames in the specified folder.
Like the idea?Simply?